DYI fix

Normally I think the most dangerous tool in the toolbox of a software-person like me is a screwdriver, we should leave hardware to those that actually knows what they are doing. Some boxes are not meant to be opened (most actually).

But I not only picked one up this week, but also got away with it with a promising result.

Some background. I have a tablet, a Nexus 7 (2013), and it was getting increasing bothersome to charge it, to the point of being practically impossible. I was very happy with it right from the start, and it still fits my needs perfectly, only thing is that it is out-of-support. And now the charging issues.

OK, lets briefly talk about obsolescence. It may be a seven years old device, but it is functioning perfectly, and we cannot afford to throw away electronic devices at the pace that we currently are. I have prolonged it somewhat by using LineageOS, which goes to show that it isn’t technical issue, it is lack of wanting. So, Google: boo! LineageOS, yeah! There haven’t been an official build from Lineage for a while too, but rumours has it, that there is a viable Lineage OS 17.1 (ie. Android 10) build out there.

So I wasn’t ready to bin it.

Searching the internet, looking at some videos, it seemed serviceable. It was the USB socket that had gotten “tired”, and you can get replacements pretty cheap – but that would involve some soldering work that I hasn’t ready to take on.

But you can actually get replacement boards like this:

ME571K charging USB port board

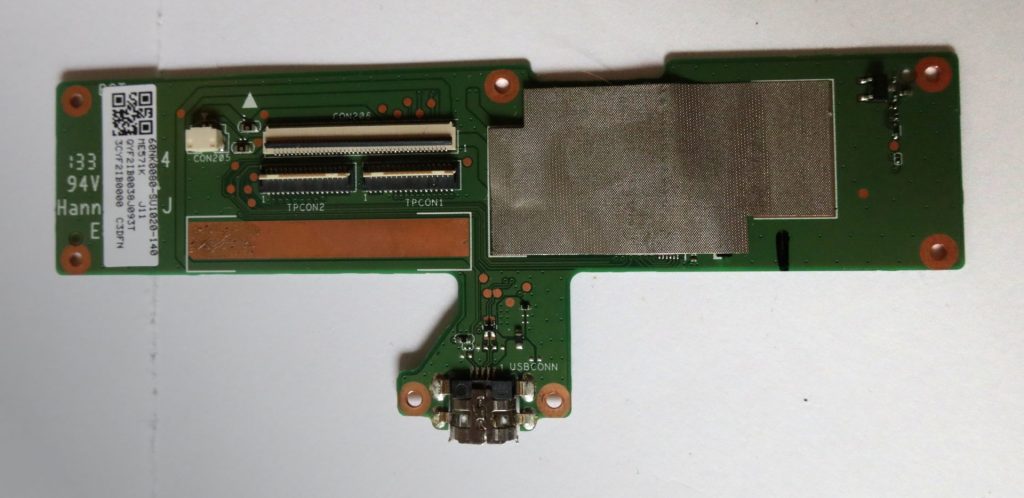
And actually that picture is of the original board that I replaced.

Replacing it turned out to be fairly easy. No soldering required, only seven tiny screws and four cable all with nice connectors. I was very surprised with how modular and serviceable the Nexus 7 was build. Actually prying it open was probably the most daunting part.

If you venture this way too, I highly recommend finding a good video; it is a huge advantage knowing what to pull and in which direction. Also take note of how far the two cables coming from the usb side goes in (TPCONN1 and TPCONN2); it isn’t obvious, and it took me some work to get it right.

And now I have a tablet that charges like a dream again (and a spare charger board with a defective USB connector).

sudo docker

For some reason it annoys some people to have to sudo every docker commands. I am not sure if it is the extra five characters, having occasionally to enter your password or constantly being reminded that your action might have consequences, that annoys these people.

There are some easy fixes to the part about typing (fixing people and their notions is infinitely harder), but there is a reason for it not being the default: being able to access the docker engine is effectively the same as being root (this article sums it all up pretty neatly), thus asking anyone doing so to actually be root first is prudent. But if this doesn’t bother you, read on.

Don’t confuse this with running docker containers; a lot of effort has gone into making containers safe to run. This is about access to the docker engine.

The first option is to add the user to the docker group. This will allow the client to access the docker engine port directly. This is limited to docker and the docker engine, but there will be no logging of the commands as there will be with sudo.

The other option is to use the /etc/sudoers to allow sudo to be used without password. Consider if this needs to be for all command, or if it should only allow passwordless sudo for running docker (and maybe a few other select commands).

If typing the five extra letters to prefix with sudo still annoys you, consider making an alias. See above mentioned article for details.

Or just use sudo -i. You will still need to type your password once, but you will still be root after that telephone call or coffee break, and it will be obvious to anyone, including yourself, what is happening.

Timeshift

I have been using Linux Mint for quite a while now, and Linux Mint has had Timeshift since Mint 19, which is about two years by now. But I haven’t noticed it until recently, and it is actually pretty nifty.

An example: I was consolidating services on my network, and as VLANs were involved, it meant reconfiguring the network of one server. And at one point, I had tried so many ways of doing that, that I really wanted to see exactly how my setup was shortly before I started messing around. Timeshift to the rescue!

My server runs with Linux Mint and thus is based on Ubuntu and thus uses netplan (and VLANs and netplan is worthly a post on its own!). So it was as easy as:

diff /etc/netplan/1-network-manager-all.yaml /media/media/timeshift/snapshots-daily/2020-07-17_20-00-01/localhost/etc/netplan/1-network-manager-all.yaml

(you’re not afraid of long commandlines, are you?)

So let’s talk about Timeshift. Timeshift is made for scenarios exactly like this; when you are tinkering with the setup of your systems and really wish you could go back in time to a point, where it still worked. It can restore all files to that point, or you can look at individual files just as I did.

This is also why Timeshift by design and by default excludes your home folder. If you want to restore your system to the way it was like, say, a month ago, you would very likely not want any of your files in your home folder to revert back too when doing so.

It’s is also not version control. If I wanted to see the entire history of changes, I would need another tool.

And it is also not really a backup. To save space, Timeshift links files that are unchanged between shapshots, which is pretty nifty. It is like having a copy in each snapshot, but you really only have one file, and you can delete a snapshot without affecting any of the others – the file stays until you delete the last reference. But this also means that if a files fails on the backup for some reason, it fails in all instances.

What Timeshift does, and does well, is to allow you to revert your system to a known good previous state.

One last word about Timeshift:

It will back up to a folder in the root of a filesystem called /timeshift, and by default the root filesystem. I usually configure my systems with a fairly small root filesystem and then mount in the space-consuming parts as separate filesystems. It is much more manageable that way (see my previous post about upgrading Mint for an example).

This also means, that I really do not want Timeshift to be in the root filesystem, and for my personal system the filesystem mounted as /home would be ideal. But I use an encrypted home folder, and how will that work out?

Turns out it works just fine. Without going into too much details, it is the individual home folders of each user that are encrypted and not the entire filesystem. So pointing Timeshift at the filesystem mounted as /home will make it place its snapshots unencrypted alongside the files holding the encrypted home folders (and then it will be accessible as /home/timeshift).

Linux Mint 20

I have just updated to Linux Mint 20.

That doesn’t sound like much of an achievement, but let me tell you a bit about my setup:

I dual boot. I love Linux and I have been doing just about anything I do on my computer on Linux including post processing of my photos (OK, some day we shall have a talk about Canon). The only caveat is gaming, and I do game too – and it is not really viable to avoid Windows, if you game. So I have been dual booting a Linux Mint and a Windows 10.

I use UEFI. Why? Because I was told it was safer and more modern, and who wouldn’t like that? But it can make things like dual booting infinitely more challenging. Did you know that Linux Mint is based on Ubuntu, which means the bootloader goes into the same directory? The bootloader needs to be signed, and the signing key trusted by the BIOS – and how does an open source OS then gets signed?

And talking about UEFI and dual booting Windows: install Windows first; it does not seem to understand why you would want anything but Windows.

I needed a clean install. I have used the current Linux Mint for quite some time, and many things have come and gone, so I really needed a clean start. Combined with the fact that the root partition was on the small side and not extendable, it all pointed to a clean install. Which ideally would mean triple booting: Windows and old and new Linux Mint.

I use an encrypted home folder. It does cost some performance, but encryption is cool, and it means that I do not have to worry that much about what may lie around when I am done using the hardware. But the encrypted home folder is supposedly tied to the OS. How to handle that when doing a fresh install? And not only do I use an encrypted home folder, /home is a separate partition on other drive.

With a setup like this, I did a lot of contingency planning. But it simply worked. Hats off to all those involved in making that work!

Here is how it went:

First I booted into Windows and told it that I wanted to reboot of a USB – Windows can do a lot of tricks to make shutdown and startup faster, but this would probably count as a hint not to.

Install was the usual choosing of timezone and keyboard layout etc. Choose the exact same user and password as before (this is important). When it comes to choosing how to layout the filesystem across partitions, choose custom.

Now make the installer allocate space for a new partition for the root filesystem. Swap can be shared with the other instance – they will never run concurrently when in a multi boot setup. And mount the /home from the existing partition (do not format – which is the default).

The installer will recognize not only that there is a Windows and another Linux, and add them to the boot menu. But it will also allow the /home folder to be shared even though it is encrypted.

As most of my settings are persisted in my home folder, it means mostly just reinstalling all that I want to keep. Everything so far has just picked up as if nothing had happened. And I can still boot into the old version of Mint – at some point some applications will deviate enough to not be able to coexist, but it is still nice to be able to see, exactly how things where.

I am very impressed.